Create a neon sign
What you’ll need
This sample file is an Adobe Stock asset you can use to practice what you learn in this tutorial. If you want to use the sample file beyond this tutorial, you can purchase a license on Adobe Stock. Check out the ReadMe file in the folder for the terms that apply to your use of this sample file. Any reference to “Night Owl Market” is for demonstration purposes only and is not intended to refer to any actual organization, products, services, or creative work.
In this project, you’ll take line art created in Adobe Illustrator and make it look like glowing, flickering tubes of neon against a brick wall in After Effects using a combination of Outer Glow and Inner Glow layer styles, a simple expression, and the Turbulent Noise effect.
Set up your layered artwork in After Effects. Working in the Standard workspace, choose File > Import > File and import your layered Illustrator logo design as Composition — Retain Layer Sizes. Open the comp and choose Composition > Composition Settings. Set a relatively short duration in the Settings dialog box (say, 5:00) to save on render time while testing. Precompose each layer separately except for any layers that act in unison, such as the three Eye layers in our example. Group-select those before choosing Layer > Pre-compose. Since you’ll be making copies of these precomp layers later, give them distinct colors now. Right-click each layer’s color chip and choose a unique color for it from the menu.
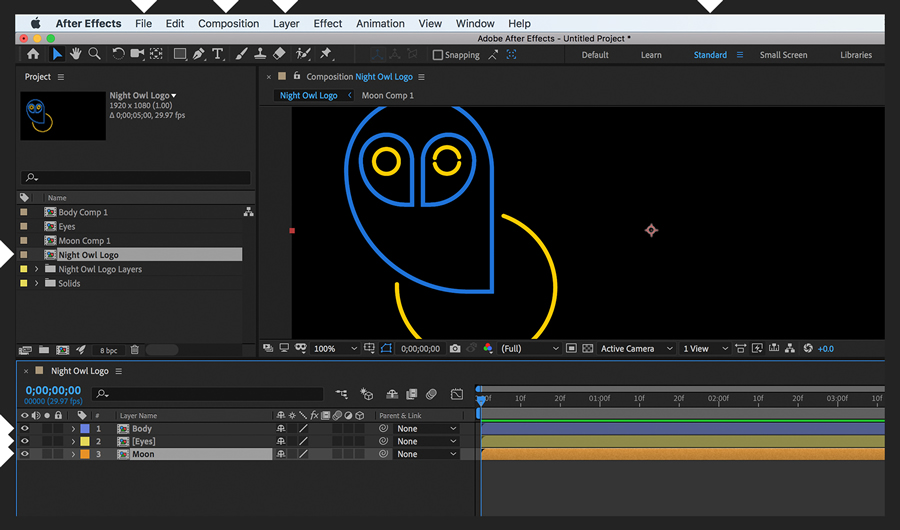
A realistic glow requires three line styles: a wide, feathered outer glow for the illumination effect, another above it for a medium-wide glow, and one on top of that to simulate the tight, halo-like glow that is brightest in the center of the tube and darkest toward the edge. Drag-select all the precomp layers and duplicate them (Edit > Duplicate) twice. Going from top to bottom, append _Tight, _Medium, and _Wide to the grouped layer names. Glows look best against a black solid, so create one (Layer > New > Solid) and place it at the very bottom. Right-click it and select Guide Layer. This ensures you’ll have a black solid for testing purposes that won’t be visible in the final comp when you add the brick wall behind it later.

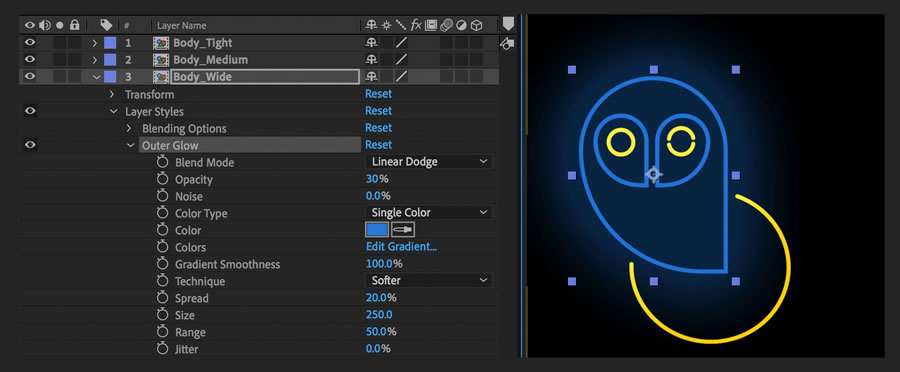
To add the outer glows, right-click Body_Wide and choose Layer Styles > Outer Glow from the menu. Expand the Outer Glow settings in the Timeline panel and, following our example, change the values for Blend Mode, Opacity, Color, Spread, and Size. Select that Outer Glow layer style and copy it to the Clipboard (Edit > Copy). Select the other two Body layers, as well as the other two Wide layers, and choose Edit > Paste to apply the changes. Click away to deselect all. There are too many copies of the exact same glow, so for Body_Tight, lower the Outer Glow size substantially (try 15) and for Body_Medium, reduce the size by about half (try 100). Change the Outer Glow colors for the other Wide layers so they match their respective line art colors. Now copy the Outer Glow settings for Body_Tight and Body_Medium and paste them onto the corresponding layers for Eyes and Moon, updating the colors to match.
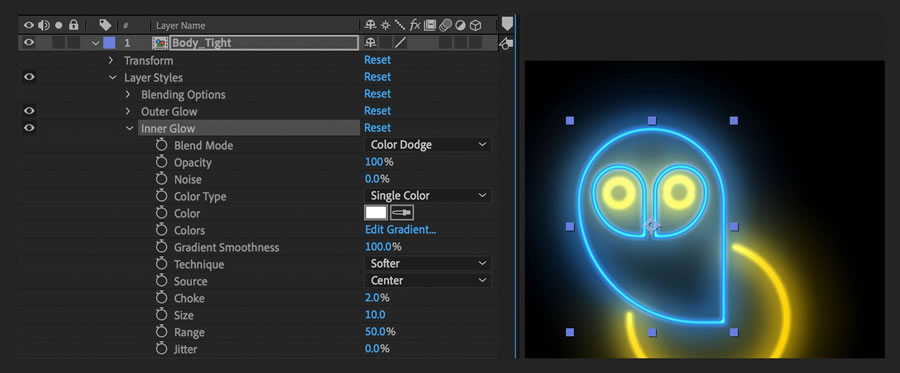
Now add the inner glows. Right-click Body_Tight and choose Layer Styles > Inner Glow. Expand the Inner Glow settings in the Timeline panel and, following our example, change the values for Blend Mode, Opacity, Color (FFFFFF), Source, Choke, and Size. Apply that line style to all Tight layers. It looks better if Moon_Tight uses a Blend Mode of Linear Dodge and a lower opacity. Adjust any inner or outer glows until you are happy with the results. Preview at Full Resolution to see the glows accurately.
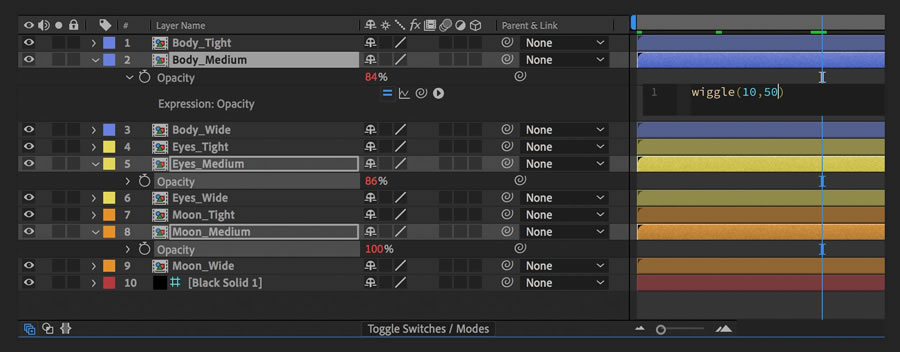
Let’s make the neon flicker. Pick any Medium layer and display the Opacity setting (press T). Option/Alt-click the Opacity stopwatch. In the Expression field, replace “transform.opacity” with wiggle(50,10) and then click away. Copy that Opacity setting to the Clipboard and paste it on the other two Medium layers. As you scrub the playhead, see how the red Opacity value constantly changes, causing the slight flickering effect.
A subtle neon plasma effect enhances the look. Open the Moon precomp and drag the Turbulent Noise effect from the Effects & Presets panel to the Moon layer. Following our example, change the values for Fractal Type, Brightness, Complexity, Opacity, and Blending Mode. Move the playhead to the start of the comp and set a keyframe for Evolution. Move to the end and set a keyframe for Evolution at 36 revolutions (and zero degrees). Preview to see the slight oscillating neon plasma effect added. Deselect the layer, select it again, and copy the Turbulent Noise effect to the Clipboard. Open the other precomps, set the playhead at zero, and paste the effect. For the multilayered Eyes precomp, drag-select each layer before pasting the effect. The Opacity setting copied over from the yellow may be too much for other colors. Lower the opacity for the blue (try 15%).

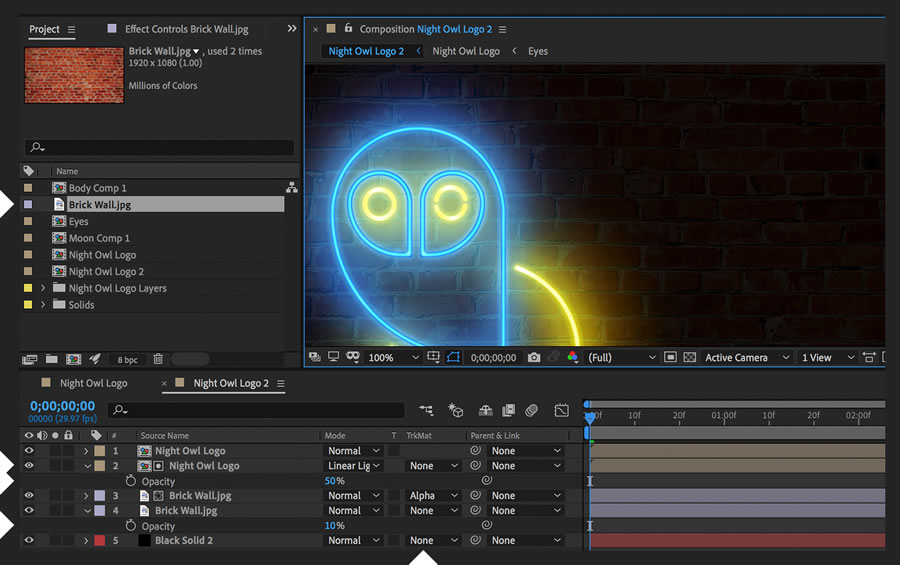
Neon signs look great on a black background, but they often appear against a brick wall. To composite your sign in front of a wall, right-click your main logo comp and choose New Composition from Selection. Duplicate the layer in the new comp and set the Blending Mode of the lower one to Linear Light and Opacity to 50%. Create a new black solid layer and place it at the bottom of the comp. Import the brick wall image, drag it just above the black solid, and duplicate it. Set the upper wall layer’s Track Matte to Alpha Matte and reference the logo layer above it. This automatically turns visibility for that logo layer off, so click the eyeball to restore its visibility. The wall is too saturated, so lower the bottom wall layer’s opacity accordingly (try 10%).
Adding more neon elements to your sign is as simple as importing the artwork, adding it to your master logo comp, and applying the glow, flickering, and neon plasma effects. If your new artwork uses thinner lines, reduce the Inner Glow size. If the Outer Glow on your artwork looks flat, increase the Range setting slightly. This controls the gradient between the core and outer edges of the glow. Finally, give your sign some personality by turning a neon element briefly off or on in its precomp. For example, you could open the Eyes precomp and trim the Right Eye Top layer to a couple dozen frames so the right eye winks rather than remaining lit. Try to make the moon briefly turn off.
With Adobe Stock, you have access to more than 100 million high-quality, royalty-free images including photos, graphics, videos, and templates to jump-start your creative projects. Try Adobe Stock and get 10 free images.
Источник
Deep Glow 1.4.1

Deep Glow 1.4.1 (скачать бесплатно) — предлагает вам наилучший вариант эффекта свечения прямо из коробки, даже работая в нелинейном цветовом пространстве. Он имеет интуитивно понятные элементы управления композитинга, чтобы вам помочь в тонкой настройке результатов свечения. Deep Glow также имеет GPU-ускорение для обеспечения скорости, удобную понижающую дискретизацию и контроль качества, которые также могут быть использованы для достижения уникальных результатов (зернистое или стилизованное свечение).
• Physically accurate inverse square based falloff
• GPU acceleration
• 8, 16 and 32bpc compatible
• HDR thresholding
• Thresholding Smoothness (reduces temporal flicker)
• Gamma correction (linear results even when working in non-linear colorspace)
• Compositing controls
• Glow aspect ratio
• Glow spread
• Chromatic Aberration
• Downsample quality controls
• Blur quality controls
• View controls: glow source or final render
• Unmult (useful for text)
• Tint options and blending modes to add colour to your glow
• Dithering controls to reduce colour-banding artifacts
Версия: 1.4.1
OS: Windows 7/8/10 (x64)
Совместимость: After Effects CS6 — 2020
Язык интерфейса: Английский
Таблетка: Серийник
Размер: 3,92 МБ
СКАЧАТЬ БЕСПЛАТНО Deep Glow 1.4.1
Нажать на кнопку «Выберите способ скачивания» , после выбрать файлообменник с которого будет скачан архив.
Весь предоставленный софт безопасен для установки и скачивания
Источник
Glow эффект для after effects
Эффект Свечение. Glow. After Effects
Эффект «Свечение» выполняет поиск более светлых частей изображения, после чего осветляет эти пиксели и окружающие их пиксели, чтобы создать диффузный светящийся ореол.
Эффект «Свечение» также способен имитировать избыточную экспозицию ярко освещенных объектов. Свечение можно создать на основе исходных цветов изображения или на основе его альфа-канала. Эффект «Свечение» на основе альфа-каналов создает диффузную яркость только по краям изображения, между прозрачными и непрозрачными областями. Также можно использовать эффект «Свечение» для создания градиентного свечения между двумя цветами (цвета А и В) и для создания многоцветных эффектов с циклической обработкой.
Рендеринг эффекта «Свечение» при выборе значения качества «Наилучшее» может изменять внешний вид слоя. Такое изменение неизбежно, в частности, при использовании произвольных карт Adobe Photoshop для окрашивания свечения. Обязательно выполните предпросмотр качества «Наилучшее» перед тем, как выполнить рендеринг эффекта.
Примечание.
Свечение выглядит ярче и более реалистично в проектах с глубиной цвета 32 бит/канал, так как высокодинамичный диапазон таких проектов предотвращает обрезку значений цвета для свечения. По этой причине рекомендуется работать с глубиной цвета 32 бит/канал, даже если элементы видеоряда не содержат значений цвета в высокодинамичном диапазоне.
Этот эффект работает с цветом 8 бит, 16 бит и 32 бит на канал.
Свечение на основе
Определяет, создано ли свечение на основе значений цвета или значений прозрачности.
Пороговое значение свечения
Задает пороговое значение в процентах от значения яркости, к которому не применен эффект свечения. При более низком процентном значении свечение применяется к большей части изображения; при более низком — к меньшей.
Радиус свечения
Расстояние (в пикселях), на которое свечение выступает за границы областей светлых тонов изображения. При выборе более высоких значений создается диффузное свечение; при выборе более низких значений создается свечение с более резкими краями.
Интенсивность свечения
Яркость свечения.
Составной оригинал
Определяет способ композиции результатов эффекта на слое. При выборе параметра «Поверх» свечение помещается поверх изображения, используя метод смешения, выбранный для операции «Свечение». При выборе параметра «Позади» свечение помещается позади изображения, создавая, таким образом, фоновую подсветку. При выборе параметра «Нет» свечение отделяется от изображения.
Примечание.
Чтобы уменьшить слой до области свечения, выберите значение «Нет» для параметра «Составной оригинал» и значение «Нет» для операции «Свечение». Чтобы обеспечить блокирование эффектом свечения всех слоев под ним, следует выбрать для операции «Свечение» значение «Альфа-канал силуэта». Эти эффекты свечения более заметны, если изображение содержит растушевку краев.
Цвета свечения
Цвета свечения. Параметр «Цвета А и В» создает градиентное свечение, используя цвета, заданные элементами управления «Цвета А» и «Цвет В».
Цикл цвета
Форма кривой градиента, используемая при выборе значения «Цвета А и В» для параметра «Цвета свечения».
Циклы цвета
Создает многоцветный круговой ореол в свечении при выборе двух или более повторов. При выборе одного повтора выполняется циклическая обработка градиента (или произвольной карты), заданного для параметра «Цвета свечения».
Примечание.
Чтобы создать файл произвольной карты (AMP), можно применить эффект «Кривые», выбрать значок пера и щелкнуть значок сохранения (дискета). Чтобы использовать файл произвольной карты в эффекте «Свечение», щелкните ссылку «Параметры» и выберите AMP-файл.
Фаза цвета
Место, где начинается повтор цвета в цикле цвета. По умолчанию цикл цвета начинается в исходной точке первого цикла.
Средняя точка А и B
Средняя точка определяет баланс между двумя цветами, используемыми в градиенте. Чем более низкое задано процентное значение, тем меньший используется объем цвета А. При выборе более высокого процентного значения используется меньший объем цвета В.
«Цвет А», «Цвет В»
Цвет свечения при выборе значения «Цвета А и В» для параметра «Цвета свечения».
Размеры свечения
Задает свечение как горизонтальное, вертикальное или горизонтальное и вертикальное.
Эффект «Свечение» использует ускорение на базе графического процессора для ускоренного рендеринга.
Источник
Как сделать эффект свечение в After Effects
Всем привет, дорогие читатели. Сегодня мы в очередной раз хотим поговорить об Adobe After Effects. А именно, мы хотим рассказать вам, как добиться эффекта свечения в этой программе.
Итак, в качестве исходника мы возьмем рандомный видеоролик по майнкрафту. Загружаем его в программу, после чего сразу же делаем его копию, комбинацией СTRL+D.
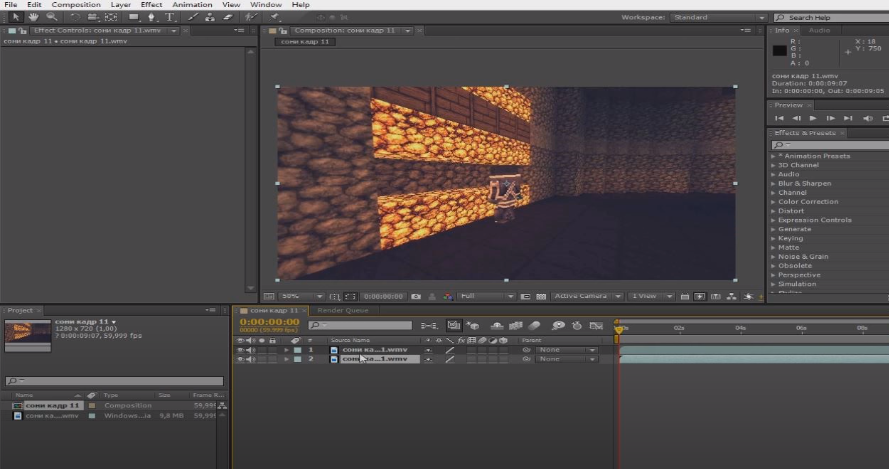
Получится, что одно видео у вас будет поверх другого. Теперь вам понадобится маска. Верхний слой (копию), вам и нужно будет использовать, для дальнейших работ. Теперь нужно будет выбрать область, которую вы хотите подсветить. Для этого, на верхней рабочей панели, выберите инструмент Pen Tool, после чего выделите область, которую хотите подсветить.
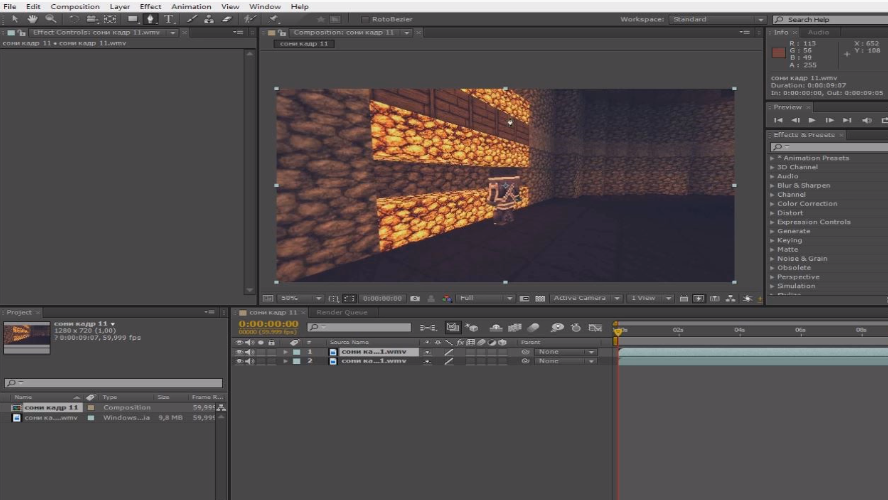
Далее вам понадобится выбрать эффект, который и будет подсвечивать вашу область. Данный эффект называется Glow. Только перетаскивайте его именно на ту область, которую вы выделили маской, а не на остальное видео, ибо у вас ничего не получится.
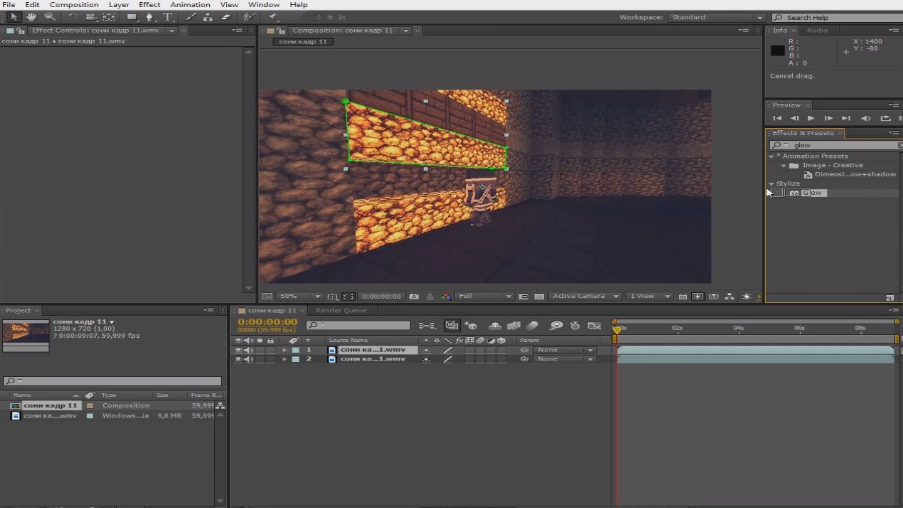
Вот, как это свечение будет выглядеть при стандартных настройках.
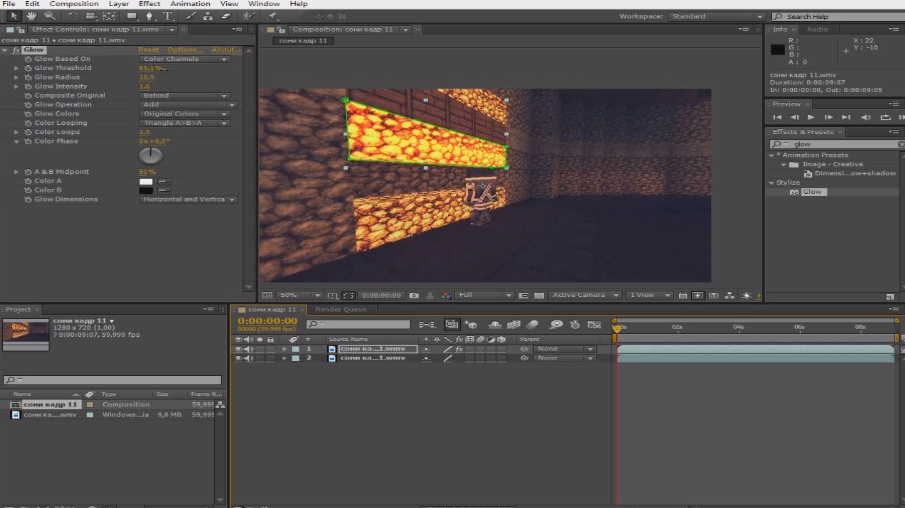
Кстати говоря, эффект свечения – это чуть ли не единственный эффект, на который мы не сможем дать вам 100% настроек. Ведь все будет зависеть исключительно от композиции, на которую вы его накладываете. Собственно, в левой части экрана есть подробные настройки эффекта. Поэкспериментируйте, чтобы выбрать самый оптимальный для себя.
Источник